This post may contain affiliate links. Please read my privacy policy.
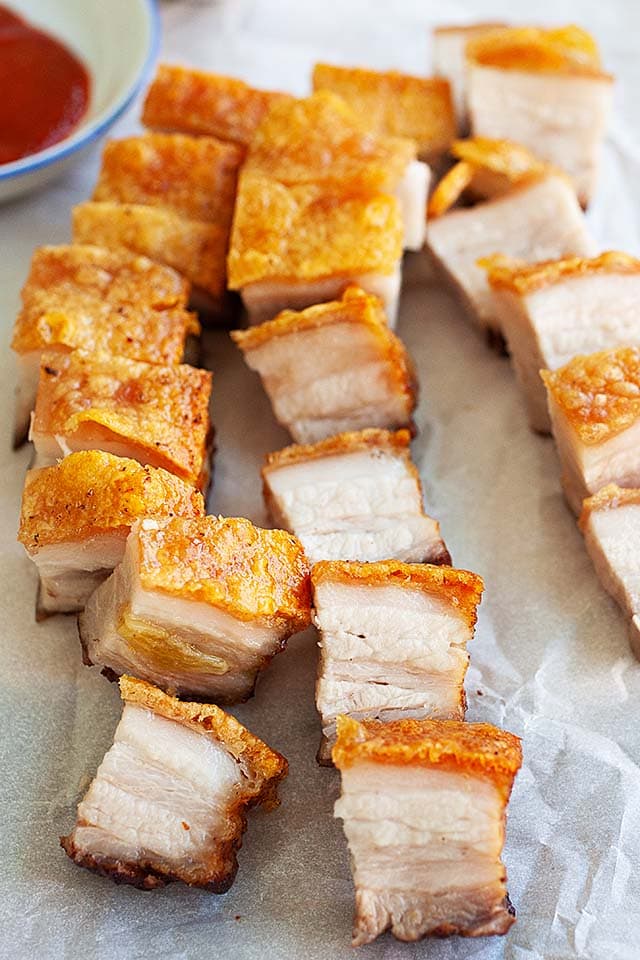
Chinese roast pork or siu yuk. Save yourself a trip to Chinatown and use this easy recipe for the best and crispiest Chinese roast pork belly at home.
Chinese Roast Pork Recipe
In my cookbook “Easy Chinese Recipes,” I have a Chinese roast pork belly recipe, or siu yuk.
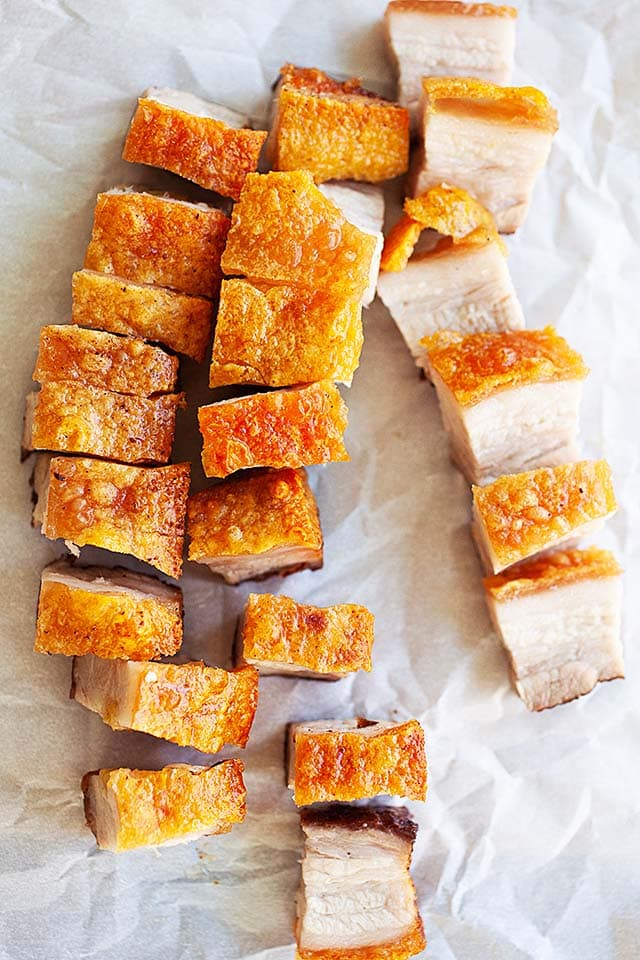
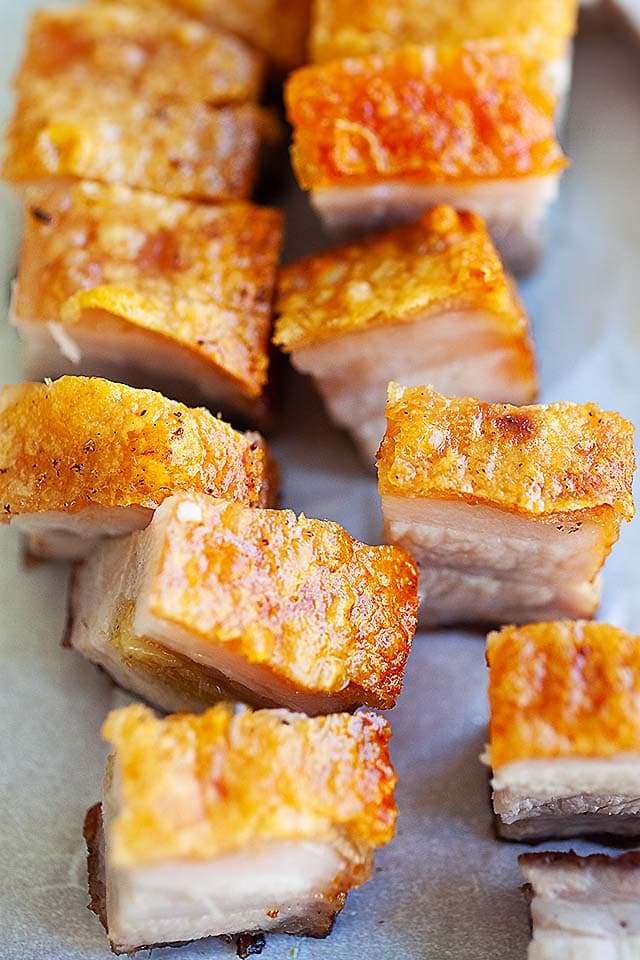
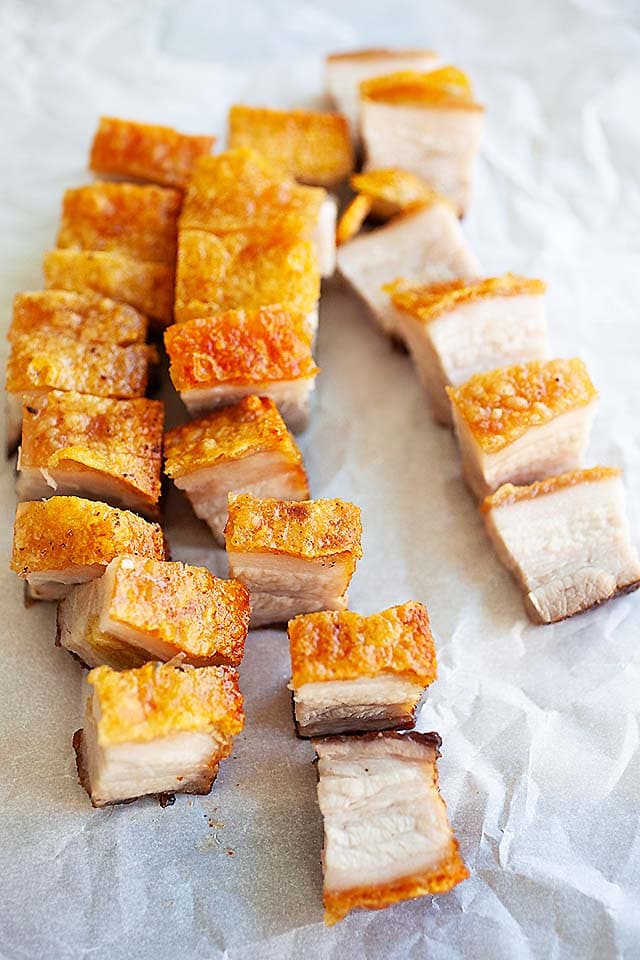
When it comes to Chinese roast pork, one could never have enough of the crispy skinned roasted pork belly. It’s sinfully delicious!
This Chinese Roast Pork recipe is from my good friend Robert Danhi’s Facebook page. Robert and his wife made the roast pork following a recipe gathered from a church in Kuala Lumpur, Malaysia.
This is the PERFECT recipe for Chinese roast pork belly! It’s absolutely mouthwatering.
The recipe is easy, hassle-free and fail-proof. I guarantee you crispy, crunchy, absolutely aromatic and to-die-for pork crackling, melt-in-your-mouth pork belly.
Why You’ll Love This Recipe
This is the easiest and best recipe you’ll find online. There is no need to poke the pork skin, there is no no vinegar in the recipe.
There is also no need to par-boil the pork belly before roasting.
The end result is very crispy pork crackling. The pork belly is also juicy, tender, with the melt-in-your-mouth pork fat.
The taste is a bit salty and aromatic. The aroma comes from the garlic and five-spice powder.
Secrets To Perfect Crispy Pork Belly
- The Salt Crust Method: Since I don’t prick the skin, the salt crust does all the heavy lifting. I pack a thick, even layer of kosher salt over the skin to pull the moisture up to the surface. Once that salt hardens into a shell and I peel it off, the skin underneath is perfectly primed to puff up and blister.
- The Steam Bath Trick: I always place a pan of water on the rack below the pork. This creates a humid environment that keeps the meat side incredibly tender and juicy while the skin side roasts. It prevents the pork from drying out during that long first hour in the oven.
- The Garlic Pocket: I make sure to tuck the garlic cloves deep into the horizontal slits. If they are poking out, the heat will push them right out of the meat as it shrinks. Hiding them deep inside ensures the garlic flavor infuses into the center of the pork belly without burning.
- The High Heat Blast: The real magic happens when I crank the heat up to 465°F after removing the salt. This massive temperature jump is what turns that dried out skin into a bubbly, crunchy masterpiece. I just keep a close eye on it during those last 40 minutes to make sure it browns evenly.
Ingredients
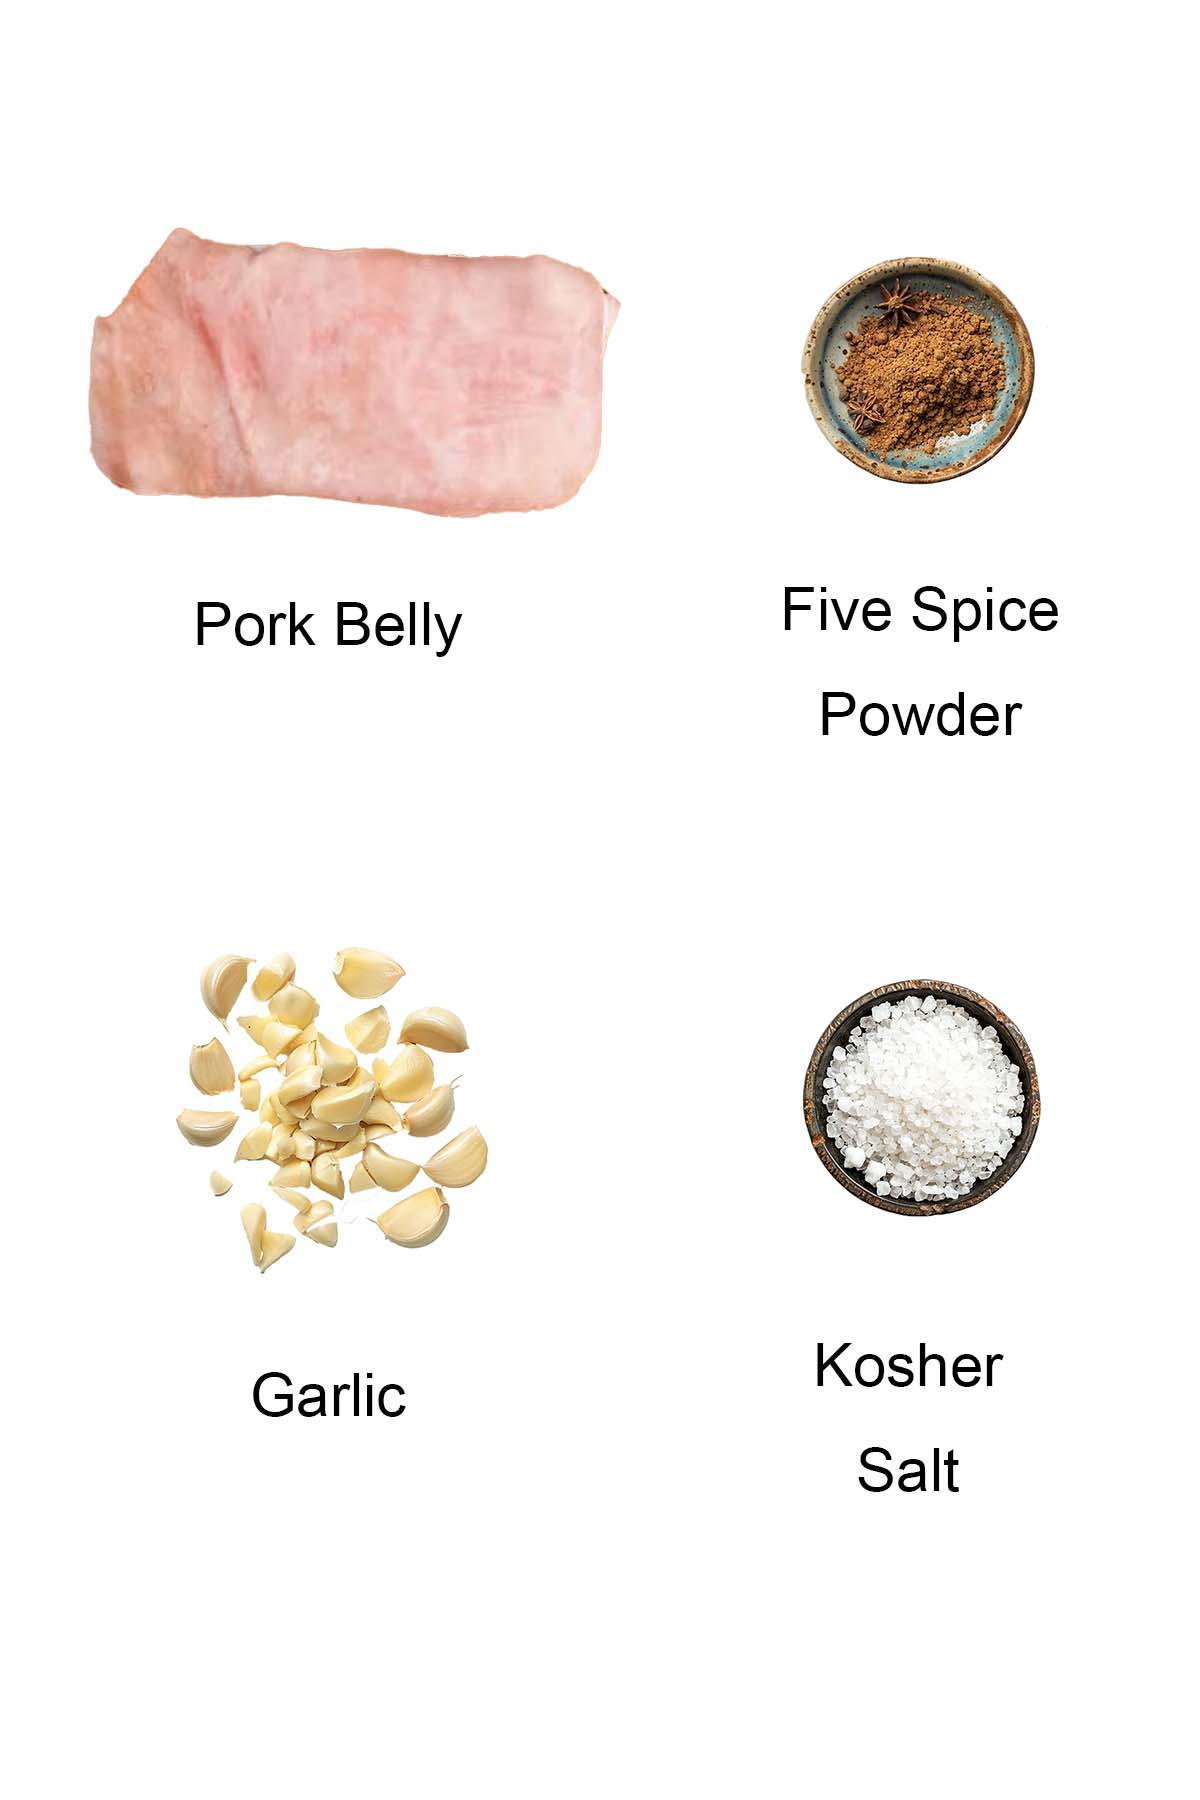
- Pork belly
- Five spice powder
- Garlic
- Kosher salt
See the recipe card for full information on ingredients.
How To Make Chinese Roast Pork (Siu Yuk)
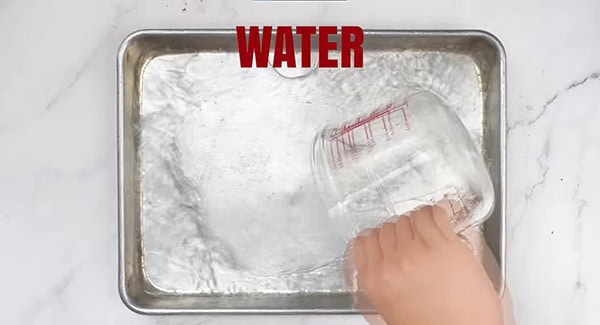
Preheat your oven to 350°F. I like to put a pan filled with water on the bottom third rack and place the roasting rack right above it. This creates a steam bath that keeps the meat side tender while the skin roasts.
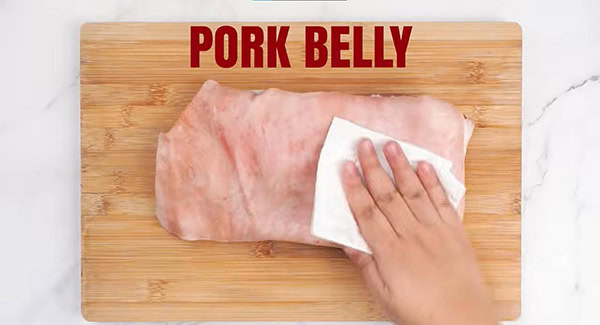
Give your pork belly a quick wash and use paper towels to get it bone dry. This is a huge step because any leftover moisture will stop the skin from getting that perfect crackle.

Make some horizontal slits on the sides of the belly. Rub the meat side with your five spice powder, making sure to keep the spices away from the top skin.
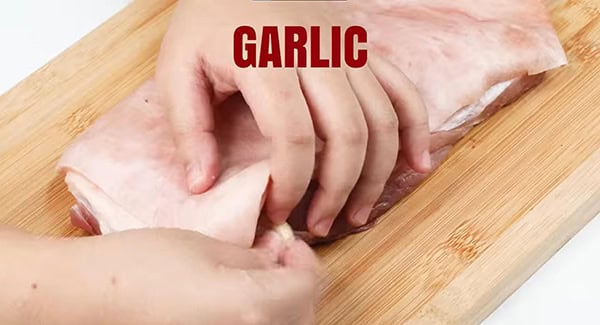
Push your garlic cloves deep into those slits. You want them tucked way in there so the meat doesn’t push them out as it shrinks during roasting.
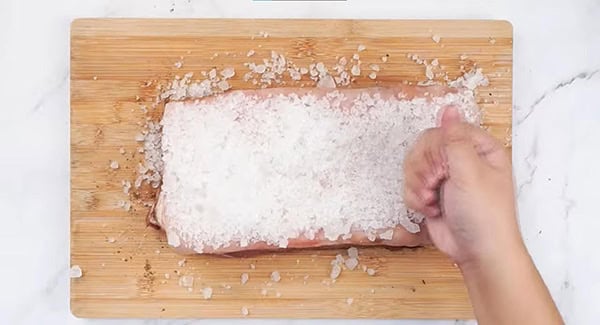
Layer the top of the pork belly with an even coat of kosher salt. This is what pulls the moisture out of the skin.
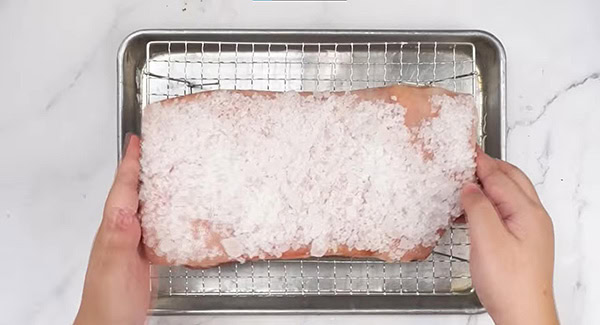
Place your pork on a wire rack. It should look like it has a solid white cap on top before you slide it in.
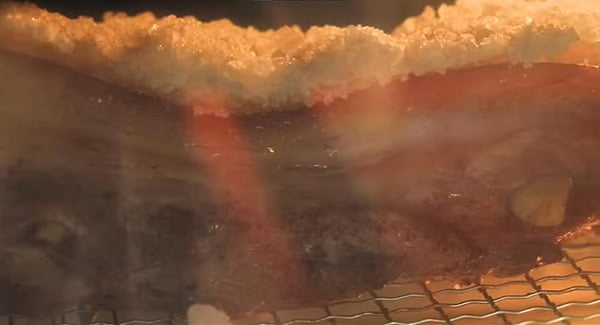
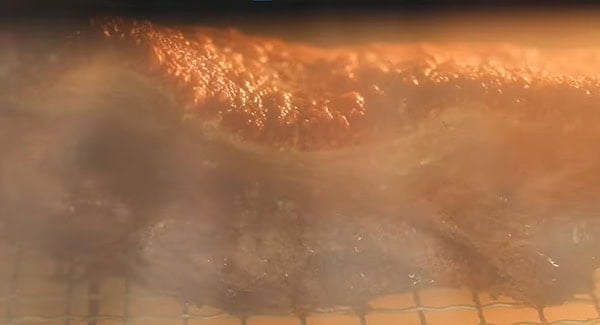
Put the pork in the top third of the oven and roast for 1 hour. You will see the oil dripping down into the water pan while the salt starts to harden.
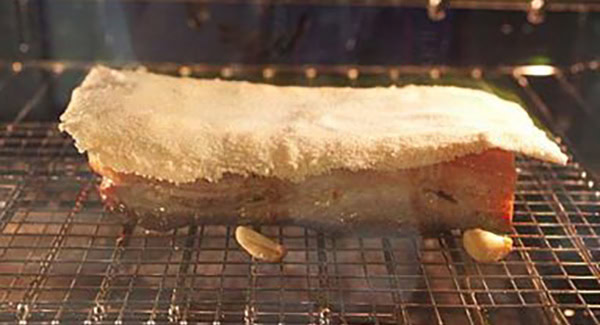
Bake until that salt layer forms a hard shell. If the water in the pan below looks low, just add a bit more so the meat stays juicy.
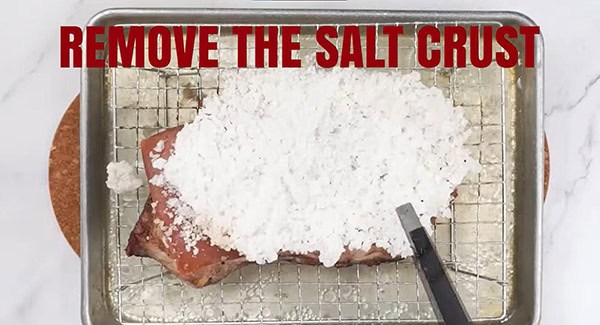
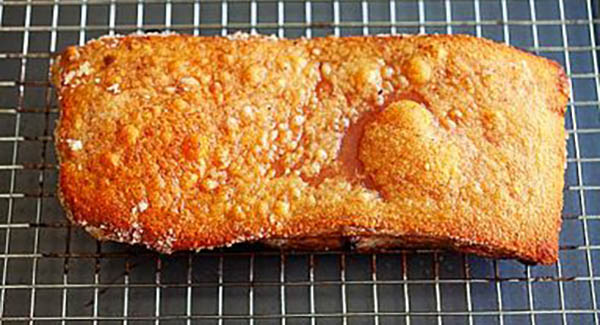
Take the pork out of the oven and carefully pull off that hard salt crust. You can go ahead and throw the salt away.
Crank your oven up to 465°F. Put the pork back in for about 40 minutes. This is where the magic happens and the skin starts to bubble and get super crispy.
Once it is done, let the pork set for 10 minutes. This lets the juices settle so they don’t run out when you cut it.

Cut it into pieces and serve it immediately. It is amazing on its own, but even better with some chili sauce and hoisin on the side.
Frequently Asked Questions
You don’t! I found that the salt crust method draws out enough moisture to give you that perfect, glassy crackle without any of the extra poking.
I don’t recommend it. Fine salt melts too quickly and can make your meat way too salty. Stick with coarse kosher salt because it stays on top and peels off easily.
This happens when the meat tightens as it cooks. To prevent this, just make sure you tuck the cloves as deep as possible into those horizontal slits before roasting.
It usually means there was still moisture on the skin or the oven wasn’t hot enough. Make sure to pat the skin bone dry and let the oven fully hit 465°F before the final blast.
Keep them in the fridge for up to 3 days. When you’re ready to eat, use an air fryer or toaster oven to bring back that crunch. Avoid the microwave or the skin will turn rubbery.
This recipe is only 446 calories per serving.
What To Serve With This Recipe
Serve this dish with rice or noodles. For a Chinese meal and easy weeknight dinner, I recommend the following recipes.


I hope you enjoy this post as much as I do. If you try my recipe, please leave a comment and consider giving it a 5-star rating. For more easy and delicious recipes, explore my Recipe Index, and stay updated by subscribing to my newsletter and following me on Facebook, Pinterest, and Instagram for new updates.
Other Recipes You Might Like
- Air Fryer Pork Belly (Siu Yuk)
- Char Siu
- Chinese BBQ Pork
- Braised Pork Belly (Dongpo Rou)
- Braised Pork Belly in Soy Sauce

Chinese Roast Pork Belly
Ingredients
- 2 lbs. pork belly
- 6 cloves garlic
- 1 teaspoon five spice powder
- Kosher salt, for layering
Instructions
- Preheat the oven to 350°F (180°C), arrange a pan on the bottom 1/3 of oven rack and fill with water. The pork belly should be roasted using the rack above it.
- Wash and use paper towels to dry the pork belly.
- Make some horizontal slits on the sides of the belly, then rub the meat side with the five spice powder.
- Insert each garlic and push them deep inside the pork belly.
- Layer the top of the pork belly with the salt evenly.
- Place the pork belly on a wire rack. This is how it should look before going into the oven.
- Place the pork belly at the top 1/3 of the oven and roast for 1 hour. While baking, the oil will drip to the bottom pan with water.
- Bake until the salt crust forms, the salt should be hardened. Check water in the pan below and add if needed. This is how the pork belly and salt crust will look like in the oven. You have to insert the garlic deep inside the horizontal slits or else they will be pushed out during the roasting process.
- Remove the pork belly from the oven, pull off the salt crust and discard.
- Raise the heat of oven to 465°F (240°C), place the pork belly back in the oven and roast for another 40 minutes.
- Remove from oven and let set for 10 minutes.
- Cut and serve immediately with some chili sauce and hoisin sauce, or eat as is.
Video
Notes
- Bake until the salt crust forms, the salt should be hardened.
- Check water in the pan below and add if needed.
- You have to insert the garlic deep inside the horizontal slits or else they will be pushed out during the roasting process.
Nutrition
Nutrition information is automatically calculated, so should only be used as an approximation.


Wonderful, beautiful, EASY crispy-skin pork belly? Yes please. I’ve cooked this several times and it always turns out absolute perfection. I adjust the cooking times to suit the the cut of pork belly I have. I find putting the pork belly under broil (use discretion) will quickly crisp up any stubborn spots on the skin if needed, and can be used to reheat as well (who on earth has leftover crispy pork belly though?). Thank you for sharing this recipe. I’ll be using it the rest of my life :)
Thanks so much for trying my Chinese roast pork recipe and loving it. :)
The first couple of times I did and it turned out nicely. But now it keep failing. The skin doesn’t turn golden and crispy but dark and hard. I’m not sure what I did wrong. I do notice when I remove the salt, the skin look wet in some area. Any thoughts? Thanks!
It means the skin is not dry, if they are not dry, it will fail.
I’m planning to make this dish for about 20 people tomorrow. I’m hosting a dinner at my friend’s apartment though, so I thought I would bake them in my oven first until the salt forms and then continue the last 40 mins baking at my friend’s apartment, do you think it will be okay? I’m afraid it will continue cooking as I drive to my friend’s place and become overcook.
Also, another question, I saw some recipes using baking soda but you omit this step, will it give the same crispy result?
I think should be OK no need baking soda the most important thing is the skin is very dry.
Not sure which step was wrong because my pork belly is really hard especially the skin. Too bad I do not know how to attach tge picture to show. T..T
Maybe you over roasted it.
… or your oven temp was quite right? Well. Was the case on my part.
But awesome recip .
Thank you so much for sharing =)
Irish/Korean Californian couple residing 2 hrs north of Toronto since beginning of the year and no real selection as far as good asian restaurants.
It’s great that my husband loves all food but I love making the Californian faves.
Yes temperature is correct. Thanks Linda for trying my recipe.
Awesome simple recipe … Loved it. Tried it once and it turns out rather well. I am impressed with my culinary skills … Lol … Thank you so much.
LOL, glad that you nailed it.
I tried this recipe over the weekend and gotta say it is easy to make and clean up is a breeze; taste is also pretty good. The fat didn’t get rendered as much as frying so it feels heavier on the mouth. Is this your experience as well?
I thought the crackling was really crispy…
Oh the crackling was really crispy, it’s so good that’s all you hear as you’re eating them =) I mean the fatty part of the pork belly didn’t get as rendered as when you fry it.
I can’t wait to make this again during our family get together, with jelly fish on the side =)
I tried this recipe for the 2nd time (didn’t do it too well the first time) and it came out beautifully succulent on the inside and nice crackle on top. It is such an easy recipe and much prefer it to buying from the shops!
Awesome Jun.
Hi Bee-where do you buy a pork belly? the regular grocery stores like pavilions and ralphs don’t cary them :-(
You’d have to go to an Asian market, like 99 Ranch, SF (Shun Fat), or HK Market.
Bee, would this work using a turbo broiler?
Just a quick question about the salt….did you just use regular table salt or was it a flakier or bigger chunks of salt? Curious how the salt stays on as a crust if its just regular table salt? Thanks for any info!
Table salt is fine.
Oh Bee…… I have done a couple of times making Chinese Roast Pork ( Siu Yok ) , the recipe was given to me by a Chinese Roast Pork seller, and looking at your recipe I think you have missed out an important step in the preparation to get the crispiness of the skin :). Can you update this recipe please to your ‘die-hard’ followers-thank you!
The method is what it is I didn’t miss any steps. There are many ways, scald the skin, poke holes, etc. This is the easiest method.
Missed something………..how rude. I think it is amazing and so do all the people I have cooked it for. Keep your wonderful recipes coming, I really enjoy your site. Thank you.
I used regular table salt. I couldn’t understand this step but I followed as written and it worked like a charm. The salt will sit on the skin and somehow will bake into a salt “cracker”. The skin and meat will shrink and the salt sort of protects the skin from becoming hard and burnt. The skin cooks perfectly. My chinese mother in law couldn’t belive that I, not chinese, could cook it the same as you would buy at the wet markets in Hong Kong.
Hi Scott, that’s amazing, I am so glad that you had a great success with this Chinese roast pork recipe and your mother in law is impressed. :)
I always serve it with 60/40 golden syrup and black treacle, delicious!
Wow, interesting idea. Thanks for sharing!
jeannetoyota@yahoo.com
Hi Bee, I couldn’t but pork belly with skin but want to try your recipe. So do i skip putting salt on top? Or iis it ok to follow all the steps through by layering the fat top with salt as you would on the skin part? And I notice that you don’t put foil wraps all around the meat like a pan, will it nor burn the sides of the meat during baking?
If you have no skin, then you are not really making Chinese roast pork as the skin is what “makes” it roast pork, know what I mean. The fat part won’t get crispy even if you put salt. You can put a bit of salt for the salty flavor.